For the Original Article Please Click Here
-
Have you had a flat tyre? Did you just go on google and start looking for tips on how to change a tyre?
If so then this page may help you. If you get really stuck best to call for some back up.
Times have changed, especially with new cars. Older cars were simple, if you got a flat tyre you would simply swap it with the spare in the boot and go on your way.
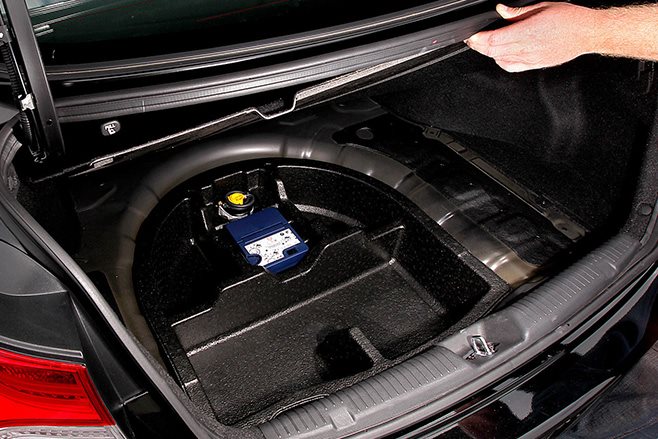
However, newer cars come with a spare tyre that is enough to get you by until you get a real tyre from a dealer. These are known as Space Saver Spare Tyres.
Space saver spare wheels are narrower than the rims fitted to the car so they take up less boot space. These types of tyres are noticably different as they are usually painted yellow or orange.
These Space Saver Tyres are only a temporary replacement and should not be driven on for extended periods of time or over 80km/h.
They also have a basic, shallow tread meaning they won’t be as effective in wet weather and will wear quicker, which limits the number of km you can travel on them.
Do you have a new upmarket car? If so you may have Run Flat Tyres
RUN FLAT TYRES
Some upmarket car makers are adding run-flat tyres as standard equipment instead of a spare wheel. Once punctured, run-flat tyres can continue to be driven on. But while this saves you having to replace the tyre, it doesn’t mean you can continue driving normally.
Like spare-saver wheels, run-flat tyres are limited to certain speeds when punctured, generally about 80km/h. (Which is the same as a Space Saver Tyre)
A punctured run-flat won’t feel as obvious as a normal flat tyre, but you’ll be alerted by a tyre pressure alert light on the dashboard. If your car is not equipped with this you shouldn’t fit run flats.
The biggest problem with run flat tyres is they’re not usually repairable meaning you’ll have to fork out for a new tyre which
How to change a conventional flat tyre
There are few steps we would recomend you take before changing your tyre, if you get stuck feel free to give us a call.
SAFETY
Don’t make a blown tyre worse by risking more damage to your car, or potentially to yourself, by stopping in the middle of the road. Your first and most important step is to ensure your safety. Pull the car over to the side of the road, or a back street if possible so you are out of or away from traffic.
EQUIPMENT
Once your car is safely on the side of the road, it’s time to get the equipment from the back of your car. If your car comes with a spare tyre, either full size or space saver, you’re tool kit should include a wheel brace with a wedged side, a jack and a jack handle. Which should be in the boot. they can be with the wheel or can be in a side compartment depending on the car.
You’ll also need to familiarise yourself with hub caps (if your car has them), and wheel nuts.
These days, some cars also feature Run Flat Tyres or a puncture repair kit so your tool kit will be quite different – make sure you’re familiar with what your car offers before purchase.
When changing your tyre, make life easier by laying everything out next to your vehicle.
PREPARATION
Before you get to the nitty gritty part of replacing a tyre, there are a few initial steps you need to take.
- If your tyre comes with a hubcap, that needs to come off. Using the wedge side of the wheel brace, loosen the hubcap and pull it off so you can access the wheel nuts.
- Next, using the brace, loosen nuts by twisting them anti-clockwise. You don’t need to take them off, just loosen them enough to make life easier later. One twist anti-clockwise should do. This can be the most difficult part.
JACK UP THE CAR
This is probably the most daunting part of a tyre change, and it’s at this point it’d be a good idea to make friends with your owner’s manual.
- Find the jacking point (use the owner’s manual because each car can be different.)
- Using your hands, wind up the jack to meet the jacking point.
- Then it’s time to connect the handle and give your shoulders a bit of a work out by jacking up the car. Make sure you lift it high enough to still leave space for the inflated tyre.
- Once the car is off the ground, it’s a good idea to place the spare tyre under the car to protect you and the car if the jack fails.
TAKE OFF THE FLAT
- Now it’s time to take the wheel nuts off. Keep in mind, removing the wheel nuts can be the most difficult and labour intensive part of changing your tyre so if you haven’t loosened them properly earlier, you’re in for a bit of fun now.
- Pull the flat tyre off the car and use it to replace the new tyre currently sitting under the car. You still want protection if the jack fails.
TIME FOR THE NEW TYRE
- Line up the centre holes of the new tyre with the studs and push it on to the car.
- Then, by hand, put all the nuts onto the tyre and tighten with fingers to stop them falling off.
- Then it’s time to remove the ‘safety tyre’ and let the jack down before you tighten the nuts.
- In a star pattern, tighten the nuts as much as possible.
- Pop the hubcap back on and you’re done.
Take it slow for the first few metres, or drive backwards and forwards a little to ensure the tyre is on properly. Then, clean the grease off your hands and you’re on your way.